Recycled Trick or Treat Bag
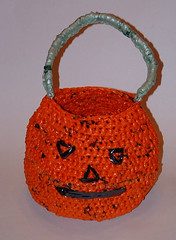
Halloween is just around the corner and I’ve been saving plastic orange newspaper bags for quite awhile so I could crochet a recycled trick or treat bag. I just got it finished in time and am here to share the project with everyone.
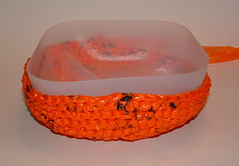
This trick or treat bag features a milk jug base so its nice and sturdy. With a sharp pair of scissors, just cut around the bottom of the milk jug as shown in the photo below. The jug I used had a line around the base so it made it easy to cut it evenly around the bottom. By recycling a plastic milk jug, you create a trick or treat basket that will hold its shape and your candy nicely.


Once you finish crocheting the bag, you can always add more embellishments like eyes and a mouth to the project. I took a few pieces of VCR tape and created a quick face for my trick or treat bag. So this concludes my Halloween project for the year. Enjoy the free crochet pattern below — Happy Halloween!
_____________________________________________________________________________________
Trick or Treat Plastic Plarn Basket
Materials needed: One ball of orange plastic bags cut into strips 3/4 inch wide and interlocked
to create a ball of plarn – (Approx. 20-25 bags)
Small amount of green plastic bags cut into plarn for strap
One plastic milk jug
Here is my picture tutorial on how to make yarn from recycled plastic bags.
Hook: K (6.5 mm) metal crochet hook
Description: Orange Trick or Treat Basket –
Basket measures 9 inches across front and 6-1/2 inches tall with 14 inch handle strap.
Directions:
Ch 3 and join with a Sl St to form a ring.
Round 1
Ch 2, then work 9 Hdc in ring, join with a Sl St to top of Ch 2. (10)
Round 2
Ch 2, Hdc in same st, work 2 Hdc in ea st around, join with a Sl St to top of Ch 2. (20)
Round 3
Ch 2, Hdc in same st, *Hdc in next st, 2 Hdc in next st*. Repeat between * – * to end of round, joining with a Sl St to top of Ch 2. (30)
Round 4
Ch 2, Hdc in sm st, *work 1 Hdc in ea of the next 2 sts, 2 Hdc in next st*. Repeat between * to end of rnd. Join with a Sl St to top of Ch 2.
Round 5
Ch 2, Hdc in sm st, *Hdc in next 3 sts, 2 Hdc in next st*. Repeat between * to end of rnd. Join with a Sl St to top of Ch 2.
Round 6
Ch 2, Hdc in sm st, *Hdc in next 4 sts, 2 Hdc in next st*. Repeat between * to end of rnd. Join with a Sl St to top of Ch 2.
Round 7
Ch 2, Hdc in sm st, *Hdc in next 5 sts, 2 Hdc in next st*. Repeat between * to end of rnd. Join with a Sl St to top of Ch 2.
Round 8
Sc in FLO around entire basket. This creates a bend for the bottom edge of basket. Don’t join at end of rnd. From this point on, do not connect at end of rounds, just continue working Hdc’s in rounds as this creates a seamless basket.
Tip: Place a marker so you know where the beginning of the rounds are though as this is helpful for last round of bag.
Rounds 9 – 16
Working in both loops now, Hdc in ea st around. Don’t join at end of rounds, just keep working around until 16 rounds are complete or your basket.
Round 17
Work 2 Hdc tog over next two sts (1 Hdc decrease made) then Hdc in about the next 12 sts. You want to work 5 decreases over the round evenly as possible. I just divided up the round and worked the 5 decreases as evenly as possible.
Round 18
Work 1 Hdc in ea st around.
Round 19 – 22
Again you work a Hdc in each st and work 5 Hdc decreases evenly throughout the round.
Round 23
*Work 2 Hdc tog (dec) then Hdc in next 3 sts.* Repeat between * to end of rnd.
Round 24
Sc in ea st around. FO with orange and weave under ends.
Strap:
Using green plarn, attach at side of basket with a Sl St and Sc in st next to where you attached to secure strap. Ch 35 and attach to the other side with a Sl St and then Sc into the st next to it to secure the other side to basket.
Turn and Sc around the chain evenly. When you reach the other side, Sl St into base where you started. Turn, and Sc back around the entire handle again to create a thick strap for your basket. Join with a Sl St into your basket. FO and weave under ends.
Insert your milk jug base into the basket by gently squeezing it together to slip it into the basket opening.
If you have any questions or find discrepancies in this pattern, please email me using contact tab above.
Abbreviations:
Beg – Beginning
Ch – Chain
Dc – Double Crochet
Dec – Decrease
Hdc – Half Double Crochet
FLO – Front Loop Only
FO – Finish Off
Plarn – Plastic Bag Yarn
Rnd – Round
Sc – Single Crochet
Sk – Skip
Sl St – Slip Stitch
Tog – Together
This pattern is copyrighted by Cindy at My Recycled Bags {dot com} and may only be used for private individual use. No commercial sales or use is permitted. Links to this pattern are acceptable. ©2010
****Please do not copy my patterns on your blog site or post my patterns on Internet sites. I do not allow my patterns to be republished without expressed written permission. Posting of my patterns, without written permission is in violation of my copyrights and is content theft.
Tags: crochet, free-pattern, Halloween, plarn, Trick-or-Treat


Oct 13, 2010
Wow! You are a wiz with plarn. Great Halloween project!
Oct 14, 2010
I love this project. I think it’s a great idea to recycle plastic bags into a trick-or-treat bag. What if we had a totally recycled costume as well? 🙂 Very kewl.
Oct 16, 2010
That is such a creative idea! I like the idea of recycling crafts like this. I have always looked for patterns for “new” stuff, without even thinking of reusing other parts. Thanks for the pattern!
Oct 17, 2010
What a cute idea! I may just have to start getting the paper…not to read, but to make recycled things!
Oct 21, 2010
What a perfect use for the orange bags. Why didn’t I think of that? I love it! Keep bringing on the ideas. Very inspiring.
Oct 21, 2010
Great initiative! Hope you have a fun Halloween!
Oct 21, 2010
wow, this is great! the shape would make super cute spring basket as well!
wonderful to see you on Craft Schooling Sunday, thanks so much for dropping by and sharing….I’ve been crocheting lately but not with plarn, and I’m starting to miss it! all the best.
Oct 22, 2010
Wow! That is so creative!! Thank you so much for linking up to Fibers on Friday!!
Nov 20, 2010
This is really sweet – what an excellent idea to use the milk carton base to make it sturdy! I still can’t crochet a chain!
Aug 10, 2012
[…] need a bag to collect all of their sweet treats. Instead of using a lifeless pillowcase, why not crochet your own trick-or-treat bag out of orange plastic newspaper bags? Add a plastic milk jug base for sturdiness and structure, and […]