
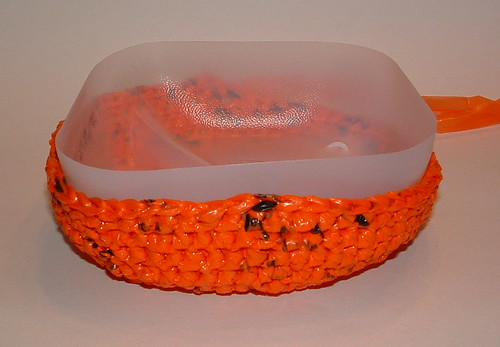
Halloween is just around the corner and I’ve been saving plastic orange newspaper bags for quite awhile so I could crochet a recycled trick or treat bag. I just got it finished in time and am here to share the project with everyone.
This trick or treat bag features a milk jug base so its nice and sturdy. With a sharp pair of scissors, just cut around the bottom of the milk jug as shown in the photo below. The jug I used had a line around the base so it made it easy to cut it evenly around the bottom. By recycling a plastic milk jug, you create a trick or treat basket that will hold its shape and your candy nicely.
Once you finish crocheting the bag, you can always add more embellishments like eyes and a mouth to the project. I took a few pieces of VCR tape and created a quick face for my trick or treat bag. So this concludes my Halloween project for the year. Enjoy the free crochet pattern below — Happy Halloween!
_____________________________________________________________________________________
Trick or Treat Plastic Plarn Basket
Materials needed: One ball of orange plastic bags cut into strips 3/4 inch wide and interlocked
to create a ball of plarn – (Approx. 20-25 bags)
Small amount of green plastic bags cut into plarn for strap
One plastic milk jug
Here is my picture tutorial on how to make yarn from recycled plastic bags.
Hook: K (6.5 mm) metal crochet hook
Description: Orange Trick or Treat Basket –
Basket measures 9 inches across front and 6-1/2 inches tall with 14 inch handle strap.
Directions:
Ch 3 and join with a Sl St to form a ring.

Just when everyone is getting into the pink and promoting pink for breast cancer awareness, I’m posting about being out of the pink. My being out of the pink is a really good thing. Because what I’m referring to is my being free of breast cancer.
For those that may not know about my pink journey, you can read all about it at the link provided. I haven’t posted about my cancer in quite awhile. Not that I don’t think about it but sometimes it’s just good not to have to dwell on cancer too much. For the first year after being diagnosed with cancer, that’s all I could do was think about my cancer. At times it felt like I could never NOT think about it. It’s always on your mind and you try real hard not to let it drive you crazy. Then as time goes on, it gets better. It’s not in every thought you have. It’s not the first thing you think about when you wake up and it’s not the last thought you have when you drift off to sleep. You do learn to deal with it or at least come to terms with it.
The battle is never easy and at times unbearable. But for me, time has helped and my body has healed. It’s been just over two and a half years now and with just having completed scans for cancer two weeks ago, I have good news. I am so happy to say — I’m out of the pink and into the NED. NED being no evidence of disease. All I can really say is praise God and try to remember to enjoy each and every precious moment of life.
If you take nothing else from this blog post, I hope you take a moment to be thankful for your health, your life, your family, your faith, and remember all those who are still battling this vicious foe. Some day all our tears will be wiped away and there will be no more pain, no more sadness, and no more death.

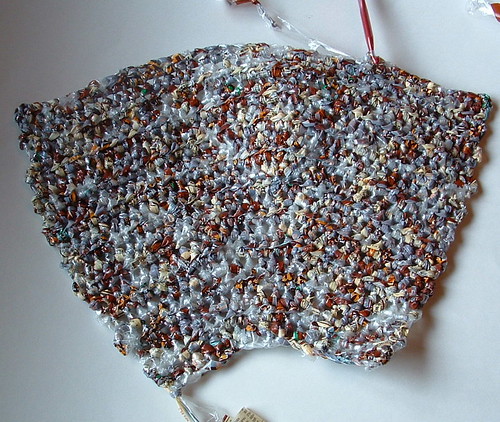
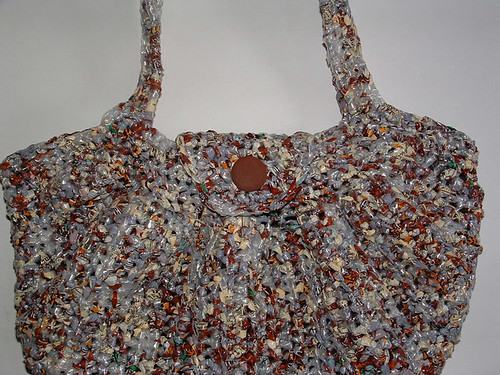
I have been working for several weeks now on a custom-ordered recycled bread bag project. The client wanted a fat bottom bag (FBB) crocheted from bread bags. What made the project unique was that the bread bags are from her husband’s bread factory. She collected bread bags from the factory’s floor of damaged products and mailed them to me to crochet her FBB.
I cut the bread bags into strips about 1/2 inch wide and created plarn using the same method I do for plastic grocery bags. I didn’t count the number of bags used but I believe its around 50 bread bags. I used the FBB English pattern here. I added the flap and button option which is detailed at my plastic fat bottom post link which also has the English chart link as the original pattern is written in Portuguese.
Working with the bread bags was much harder than the thin newspaper bags that I used in my first plarn FBB. The bread bags are so stiff making it difficult to do the gathering portion of the bag. But I was able to get it accomplished and lined the bag for my special order customer.
Here are some photos of the project as it progressed.
Beginning of crocheted shell of FBB
Shell and lining completed
The final photo shows the flap with the button sewn in place. I am excited for my customer to receive her custom-made repurposed bread bags. I hope she enjoys her unique recycled fat bottom purse.

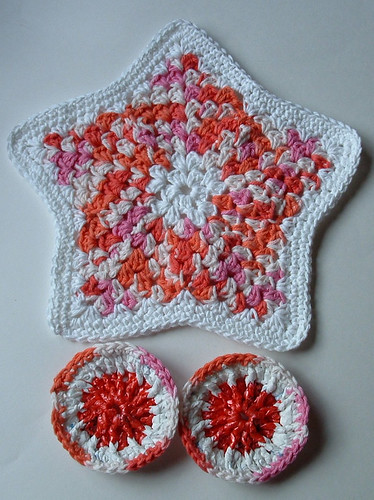
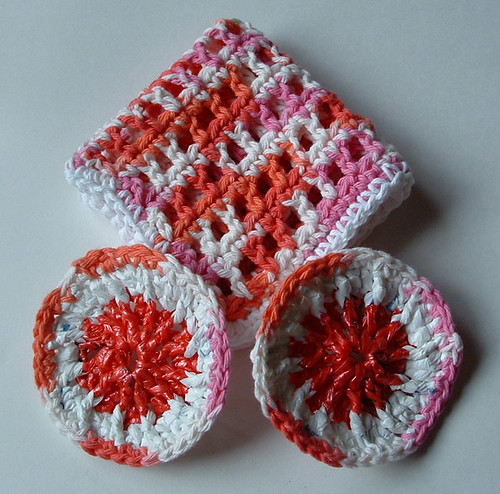
Here are a few dishcloths I crocheted along with some recycled plastic bag scrubbies. I purchased this large clearance skein of Bernat cotton yarn and have been making kitchen sets with the cotton. I crocheted the plastic scrubbies and then added a final round on the scrubbies using the cotton so it matched the dishcloth.
To the right is my star dishcloth pattern but I did the two final rounds by working Sc’s in each stitch and 3 Sc’s in each point of the star. I thought by working the last few rounds in single crochet with white cotton yarn that it added a nice finish to the dishcloth.
The scrubbie dot pattern was adapted by using plastic bags cut into 3/4″ wide strips to create plarn and then using a “J” hook, I crocheted the pattern as written except for the final round which I used the cotton yarn to match my dishcloth.
Here is my open mesh magic dishcloth pattern using the same cotton yarn. The scrubbers were again plastic bags with the final round done in the cotton yarn to match.
So if you want to crochet some recycled plastic bag scrubbies, consider adding a final round of cotton yarn to them so they can match the dishcloth to create a unique kitchen set. These make excellent eco gifts and people really find the scrubbies handy.

It was time today to harvest my potatoes that I have been growing in my round cylinder with straw. This was an experiment this season that I learned from some gardening friends on-line. They had told me about how you could grow potatoes in straw rather than in the ground.
Using a piece of fencing, I made a round cylinder. I planted one seed potato cut into 4 parts with each piece having an eye that sprouted. I placed the potato seeds on top of a small dirt mound and put the fencing around it. I wrapped a piece of burlap around the bottom to hold in the plants and moisture. Then I covered it with a thin layer of straw as the seeds sprouted. The above picture was taken in July when the potatoes were still growing. You just add a bit of straw to cover the plants as they grow. You do leave the tops exposed.
Here is a photo when it was first growing.
Once the tops flower and die, you know it’s about time to harvest your potatoes. My potatoes were at the bottom of the straw at the top of the dirt. I’m thinking that I started them too late which may have been why they didn’t grow more up into the straw.
Here is my harvest. I know it probably doesn’t look like much but this was just one small seed potato that I used. Next year, I will start earlier and plant more potatoes so my bounty is bigger. But overall I was happy with the results of growing the potatoes in straw.

You know if you have been reading this blog site for awhile that I’m all into being practical and creating things I need. So I really wanted to have a nice little cell phone holder and I just love felting so I crocheted myself this little cell phone cozy from some scrap wool yarn.
_______________________________________________________________________________________________
Free Felted Cell Phone Cozy Pattern
Crochet this cozy using about an ounce of 100% wool yarn with a G (4mm) crochet hook. Chain 14, single crochet (sc) in 2nd stitch from hook and in each stitch down to end of chain (13 sc). Working around the back side of chain, sc in each stitch to create a seamless cozy. Do not join. Continue working in rounds until your cozy measures 4-1/2 inches long before felting (approx. 19 rounds.) Slip stitch into last few stitches of final round so your finished edge is smooth. Fasten off and weave under ends on the inside of your cozy. Finished size before felting was 3-1/2 inches wide by 4-1/2 inches long.
Buttonhole Loop:
Join yarn with slip stitch in 5th stitch from edge and ch 15. Attach in the 2nd stitch over from loop base to create the buttonhole with a slip stitch. Then Sc back up the chain evenly (approx. 18 Sc’s.) Join with slip stitch back into the beginning with a slip stitch. Finish off and weave under ends.
Felting:
Place your completed cozy inside an old pillowcase and tie it closed with a knot. I felted my cozy 15-20 minutes on the hottest water. Check your cozy after 10 minutes of agitation to make sure it hasn’t felted too much to fit your cell phone. Mine needed more so I put it back into the washer. After a total of 20 minutes, mine was perfect. I pulled it out and cold water rinsed it in my sink. Shape your cozy so it’s square and check to make sure the opening is wide enough to insert your cell phone. If it’s a bit tight, just stretch the opening a little. Air dry and shape as it dries if needed.
My final felted cozy measures 3 inches wide by 4 nches long which fits my Motorola cell phone that is 2-1/4″ wide by 3-3/4″ long. This cozy is a great way to use up scraps of wool yarn you may have on hand. Just make sure you use 100% wool so your project felts properly.
Once your felting is done and its dry, add a 1 inch or larger button as desired to the front of the cozy. Voila you are done — Enjoy your felted cell phone cozy!

Check out this cute baby poncho project I recently crocheted. This pattern is fantastic and works up so quickly with no seams to sew when you finish. Aggie May’s free poncho pattern makes about a 2T child’s size poncho using a G (4.25 mm) crochet hook. You could add additional stitches in your beginning row to make a larger size.
My poncho has 16 rows before the trim and it’s 16″ long at center from the top. 19″ across the top of shoulders. In case you are wondering, the yarn is some 100% mercerized cotton I found at my local thrift store. I used about 350 yards of the cotton to crochet the poncho.
Click to supersize the closeup photo above. I crocheted around the neckline to create eyelets for a drawstring closure. I worked a SC and chain 2 in each stitch around the neck opening. I then just made a long chain and threaded it through the eyelets to complete my drawstring. And that’s it — The poncho is finished!

Check out this cool reusable tote bag I received in the mail. I just love the size and the message of this bag. It’s a roomy 14″ by 14″ tote constructed of heavy canvas and is one of the go green items that Dakota’s Personalized Gifts is offering their customers. They generously sent me this bag along with a set of their bamboo kitchen utensils to review.
The bamboo kitchen set includes 4 different spoons and spatulas along with tongs, chop sticks, and even a potholder. Plus it comes in an authentic bamboo stalk for storage. It features the wide grain of bamboo slats for beauty and durability. Overall an attractive and useful set for the price which includes free personalization on the items.
All the items I received were very nice but I must say that the tote bag is my favorite item. While I love making my own recycled bags, I am really going to enjoy using this beautiful tote bag with its great eco message. So if you are looking for some green gift ideas, please check out Dakota’s green living line of products.

Here is my latest felted wool purse project. It’s crocheted using 3 different colors of wool yarn. I crocheted each section using the blue, teal, and then creme yarn. Below are my before felting pictures of the bag and a side shot.
I felted my pieces on the hottest setting on my washer for about 18 minutes.
Here is a picture taken after I felted the main bag.
Click on photos to supersize
Here are photos of each side of my strap which was crocheted using one of main colors on each side.
I finished off the felted purse by attaching the strap and lining my bag complete with a zipper. Here is a my purse lining tutorial if you need instructions for lining a crocheted bag. The full detailed crochet pattern is below — Enjoy!
______________________________________________________________________________________________
Free Pattern for Crocheted Felted 3-Color Striped Purse
Materials needed:
3) 100% Wool Yarn (100 grams/110 yard skeins each)
Blue, Teal, and Cream colors used
Small amount of fabric for lining and pockets
9 Inch Zipper
Hook: H (5 mm) U.S. size metal hook
Description: Felted Blue Striped Bag
After felting bag measures 13 inches wide at base and 9 inches long with 39 inches strap
Directions:
Using blue wool yarn, Ch 45.


Recent Comments