
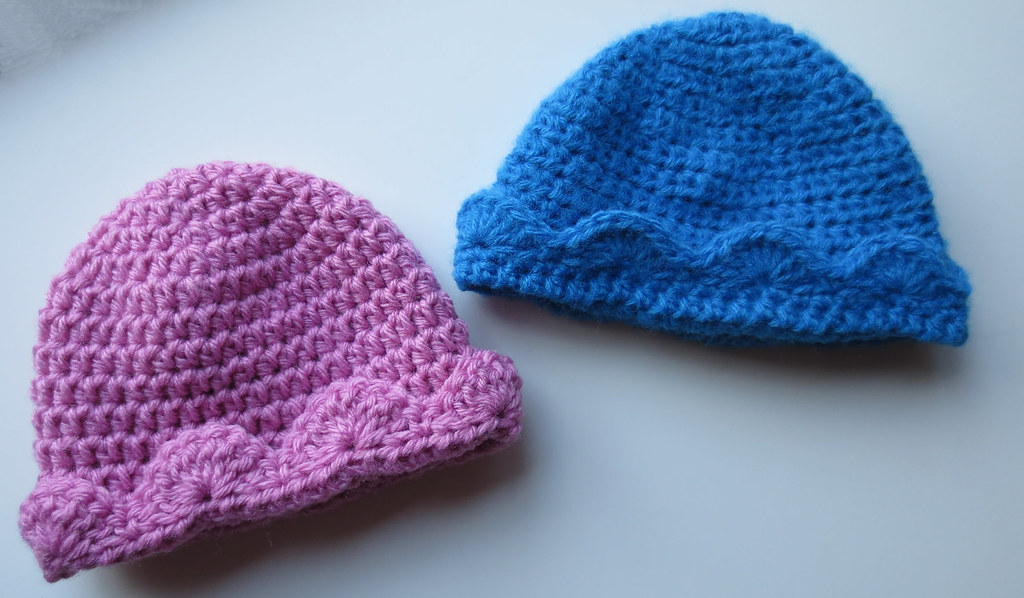
A friend at Ravelry shared this pretty crocheted scalloped hat edging. It just looked so nice on the baby hat she crocheted that I wanted to try it.
You can use any baby or child’s hat pattern you have and just add this crocheted scalloped edging to the beanie once it’s finished. The pink and blue baby hats were crocheted using a basic beanie pattern. I then added the edging to both. The only difference is that the blue hat has a round of single crochet stitching around it before I added the scallop edging round.
Scalloped Edging:
Turn, Sc in back loops only working on the inside of the hat so the scallops face out when folded to the outside of finished hat.

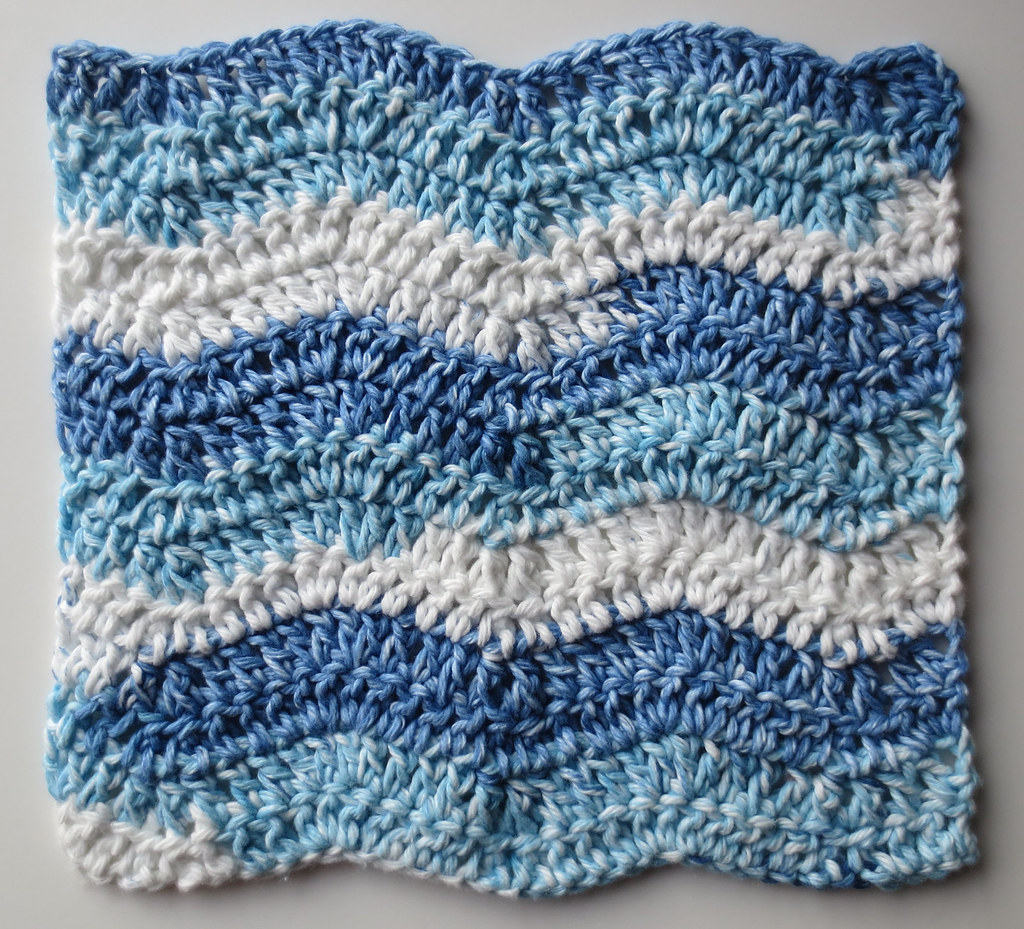
Here is my free crochet pattern for a wavy ripple dishcloth. I first used this wavy ripple style to crochet a lapghan and just love the look of the stitch pattern. So after some trial and errors, I came up with a dishcloth using blue tie-dye cotton Sugar ‘n Cream yarn.
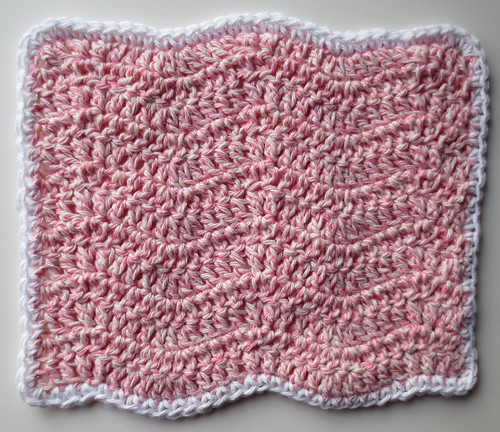
Here is another dishcloth I crocheted using the wavy ripple pattern. I ran out of the pink twist cotton yarn so I only crocheted 13 rows. I added a white edging around the entire dishcloth by working single crochet stitches around evenly. I worked 2 single crochet stitches in the corners. This trim edging gives the dishcloth a little different look and may be useful it you are trying to use up scrap pieces of cotton.
My crochet pattern may be used to make a wavy ripple dishcloth or washcloth. Mix and match colors to create your own unique crocheted cloths.
Free Crocheted Wavy Ripple Dishcloth Pattern
Description: 9-1/2 inches by 9 inches dishcloth
Hook: H (5 mm) crochet hook
Materials: 2 oz ball of cotton yarn such as Sugar n Cream
Ch 36.
Row 1
DC in 3rd st from hook,

This is my first wavy ripple project. I was inspired by Attic24 who did one of her beautiful colorful afghans using this stitch design. Here is a closeup of my wavy ripple pattern after I crocheted the stripes for one side of my lapghan.
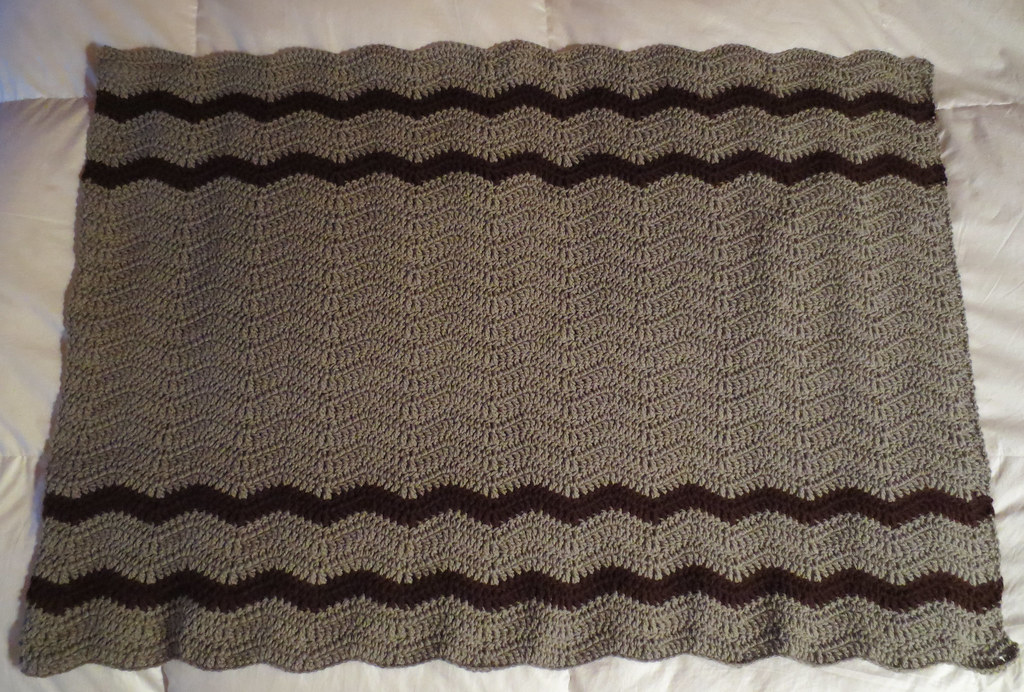
I set out to crochet my lapghan to fit a person in a wheelchair. I wasn’t sure about the starting chain number of stitches I would need for the lapghan so I ended up doing a chain of 145 stitches for my base row. Well it’s a lot wide than I would have liked at 44 inches so I ended up doing this as a long lapghan that goes down and covers a person’s legs. I crocheted this lapghan working it in rows vertically for a total of 48 rows. I used a Bernat 14 oz pounder-style worst weight yarn in a clay color along with some scrap brown yarn for stripes.
Here is the finished photo of my wheelchair wavy ripple lapghan.
Free Crocheted Wavy Ripple Lapghan Pattern
Description: Wavy ripple wheelchair lapghan blanket
Hook: H (5 mm) crochet hook
Gauge: 2 rows = 1 inch; 7 stitches = 2 inches
Materials: Bernat 14 oz/400 g yarn in clay and 3 oz of worst weight brown
Finished size: 30 inches wide by 44 inches long (wavy going up and down)
Crochet pattern written in US crochet terms.
Instructions for starting:
Chain 145 for base row.

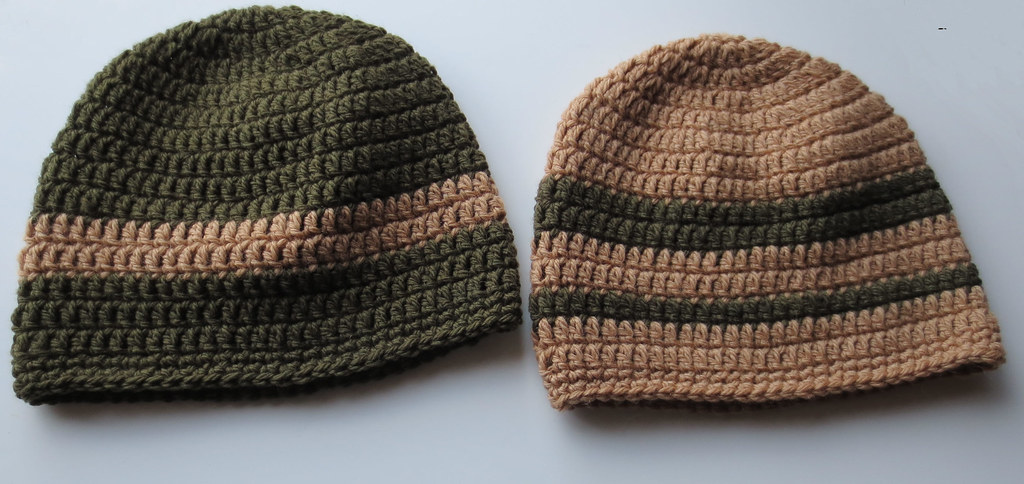
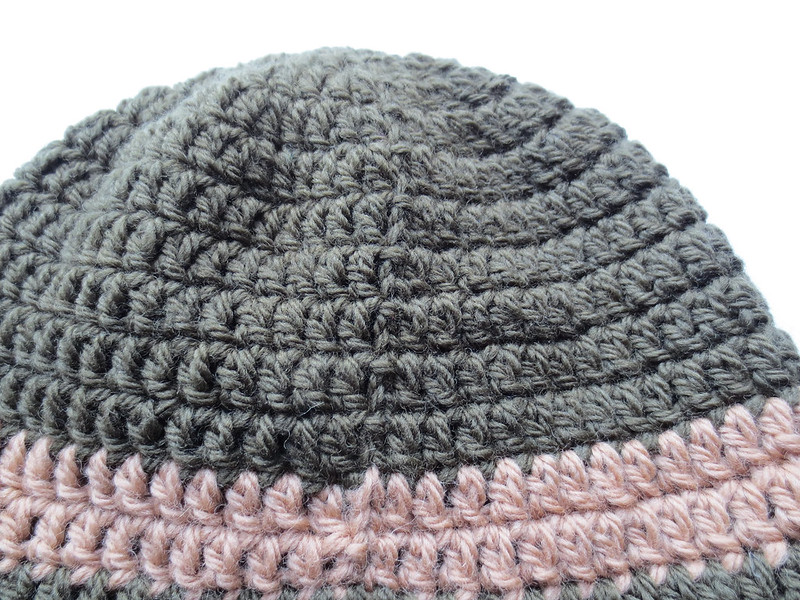
I have been crocheting helmet hats for the troops. After using a few different patterns, I tweaked my own basic pattern and thought it might be helpful to write out the crochet pattern for everyone’s free use.
These helmet caps are designed to only come to the edge of the ears. If you want a longer hat or a cuff, repeat round 6 a few extra times for a longer hat. Then add the 2 rounds of single crochet for edging trim. The two rounds of single crochet add a nice tight trim for the hats.
I only chain 2 for the beginning of my rounds. I find the joining seam is tighter this way. Here is the back joining seam. You can click on it to super size it. If you prefer you can chain 3 but I think by just chaining two, the seam looks better.
As always please enjoy the free crochet pattern below!
+++++++++++++++++++++++++++++++++++++++++++++++++++++++++++++++++++++++++++++++++++++++
Free Crochet Helmet Cap Hat Pattern
Finished adult helmet hat measures: 21″ circumference by 8″ long
Hook: H (5 mm) US sized crochet hook
Materials: 3 ozs Wool or Worsted Yarn
Mix and match yarn to add stripes as desired.
With H hook, Ch 4 and join to form ring.
Rnd 1
Ch 2, work 11 Dc in ring. Join with Sl St to beg Ch-2. (12)

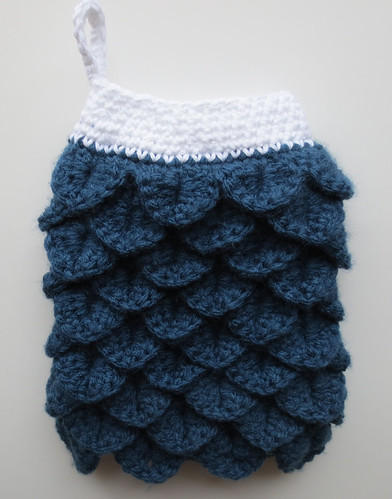
I created this oven mitt by crocheting the crocodile stitch in the round. Working the crocodile stitch in the round is so much easier than making two panels to join together. While the oven mitt is very thick with the crocodile scales, I did line it just to be sure that a person’s hand was protected.
I have the free crochet pattern written below for the crocodile stitch oven mitt. If you haven’t tried working the crocodile scales yet in the round, I think you will enjoy crocheting this pattern. Please read the complete pattern through before beginning and adjust the opening should you need a larger size as my wrist is small so I made my opening tighter.
Crocodile Stitch Oven Mitt Pattern
J (6 mm) hook and G (4-4.25 mm) hook
Materials:
2 skeins of Red Heart Super Saver Chunky (Bulky) yarn in Windsor Blue
1/2 oz. of white cotton yarn
Fabric for lining
Finished crocheted oven mitt measures 10 inches long by 7-1/2 inches wide with a 5 inches wide opening at top
Special Stitch:
Crocodile Scale Stitch: Dc 5 stitches down first post of the 2-Dc base set, Ch 1, and then work 5 Dc up the 2nd Dc of the 2-Dc set.
Directions:
With J hook and chunky yarn, Ch 42. Join to form a ring making sure your chain is not twisted.

With Easter just around the corner, I have been busy crocheting Easter eggs and Peeps for Easter baskets. We are having a Easter CAL (craft a-long) over at our group on Ravelry. A cute Peeps aka marshmallow bunny crochet pattern was shared. This pattern is very quick and easy. Here are several of them that I crocheted. I used black fabric puff paint to add the eyes.
Here are some crocheted eggs I did. Delights shared her free egg pattern on Ravelry where she uses a plastic egg and then crochets the shell around the egg. I had the idea of crocheting the egg and then stuffing it with a recycled plastic bag.

I just finished up this crocheted baby pinafore and booties for a shower gift. I used a H (5 mm) crochet hook and Lt Country Peach Caron yarn to crochet both projects. Here is the link to the baby pinafore pattern which is called Angel Wings. I found the pinafore takes about 4+ ounces of yarn to complete.
I made a few changes to the pattern and worked it in the round after row 8. At the end of row 8, I joined with a slip stitch

I think I’m addicted to crocheting baby booties. Here is the latest size I created. These pink creamy toddler booties are crocheted using one strand of pink worst weight yarn and white fingering Orlon held together. The two strands together create what I call a pink creamy look so I named the booties from this appearance. I crocheted these booties using my baby sock booties pattern.
With the two strands of yarn, they will fit a toddler about 1 year old or so. The finished size is 4-1/2 inches long by 2-1/2 inches wide. I hope you enjoy this pattern as much as I have.

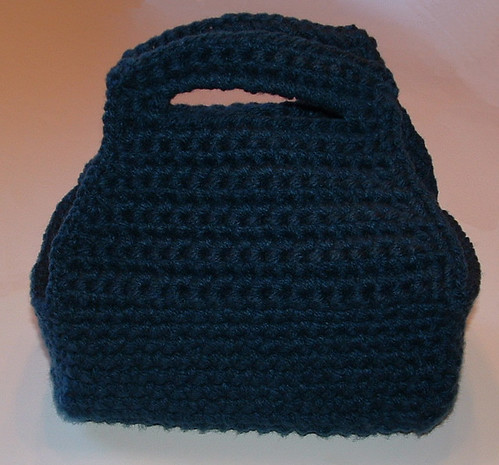
I thought I’d share my loaf pan carrier that I crocheted. I used the Crochet N More loaf tote pattern and did a few changes to fit my large loaf pan. A few people had commented on this pattern that it ran a bit small so I did a few modifications to make sure my loaf pan fit comfortably into the carrier tote.
I crocheted my loaf pan tote using two strands of Red Heart chunky yarn. The project used just under two skeins of RH Super Saver chunky yarn. I used two strands of Windsor colored yarn held together with a N (9 mm) crochet hook to work the pattern. I crocheted rows 2-12 of the pattern for a size of 5-3/4″ wide by 10-1/2″ long after row 12. After row 12 which is a repeat of row 6, I moved to row 14 and followed the patten thru row 16.
I used an H (5 mm) hook to work a single crochet (Sc) row around the top edge rather than doing the reverse Sc edging that the pattern called for. I did my edging row using just one strand of chunky yarn.


Recent Comments