Crochet a Recycled Clothes Pin Bag

Last month I purchased a sunshine umbrella. It’s one of those clothes line things you unfold and put in the ground to hang your clothes on to dry. I haven’t had anything outside to hang my clothes on for quite awhile at this home. But wanting to do the eco friendly thing, I want to hang my clothes outside to dry. It saves electricity and money on my power bill and of course is environmentally friendly!
Anyway I didn’t have a clothes pin bag. So I got busy and crochet myself one. I love to make things that I need from recycled materials and hope others do too. If you need to know how to make plastic bag yarn, here is the link. Once you have your yarn, you are ready to go!
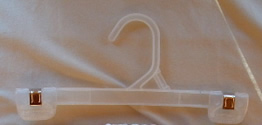
Here is a picture of the little hanger I used for the inside. It is 10 inches long and fits perfectly inside my peg bag. You might also use a baby hanger as they are small.
So what are you waiting for, grab that crochet hook and get to work!
****************************************************************************
Free Pattern for Crocheted Clothes Pin Bag
Materials needed:
One large ball of plastic bag yarn aka Plarn
One 8-10 inch long plastic hanger to fit inside bag
Hook: N (9 mm) size metal crochet hook
Description: Clothes Pin Bag
Bag measures 12 inches wide and 12 inches long
Directions:
Ch 28
Rnd 1
Hdc in 2nd ch from hook and in ea chain st down to end. Work 2 Hdc in end st, then continue around other side of chain by working a Hdc in ea st to other end then work 2 Hdc in end st.
Rnd 2
Hdc in each st around to first end, work 2 Hdc in 1 end st, then Hdc in ea st to other end, then work 2 Hdc in 1 end st. Do not connect at end of rounds, just continue working Hdc’s in rounds as this creates a seamless bag.
Rnd 3-4
Repeat rnd 2.
Rnd 5
Hdc in ea st around the entire bag bottom.
Rnd 6 – 13
Repeat rnd 5. End at side of bag to begin next rnd.
Rnd 14
Hdc in next 11 sts, Sl St in next 8 sts. Ch 1, (edit note, in some cases this Ch 1 may not be necessary, omit if not needed to make your bag.) Hdc in next 11 sts and continue around back working Hdc in ea st back to beginning side of bag. FO and weave in ends on inside of bag.
Rnd 15
Attach plarn at left side of front opening edge where 1st Hdc was made in Rnd 14 after the 8 Sl Sts. Ch 1, work Hdc in ea st of row back around to front opening, ending with Hdc in last st before opening.
Tip: Check to make sure both sides are matched and balance. Adjust your sts if needed so both sides and opening is even on either side.
Rnd 16 – 20
Ch 2, turn. Hdc in ea st back to beginning opening.
Rnd 21
Working with RS facing out, Hdc in across rnd to opening. Do not turn. Ch 12.
(Allow extra sts as to create an arch for opening.)
Join with a SC in opposite side of opening, Hdc in ea remaining st of rnd.
Rnd 22
Hdc in ea st to start of Ch 12 opening, work 16 Sc around the chain evenly then Hdc in ea remaining sts of the round. End at side of bag.
Rnd 23
Work 1 Hdc dec over the next two sts at side of bag (work 1 Hdc together over 2 sts to create 1 dec). Hdc in ea st to other side of bag, work 1 Hdc dec over next 2 sts at side of bag to match other side.
Rnd 24
Hdc in ea st around entire bag.
Rnd 25
Work 1 Hdc dec over next 2 sts at side of bag, then Hdc in ea st to other side of bag. Work 1 Hdc dec over next 2 sts at side of bag, then Hdc in ea remaining st of rnd.
Rnd 26
Starting at side of bag, Hdc in ea st around to where arch begins for front opening (You are still at back of bag). To match arch in front, Dc in ea st behind arch opening to match front arch. Then switch back to hdc st once arch match is completed at back side of bag. Hdc in ea remaining st around side and across front back to the beginning. End at side of bag.
Rnd 27
Ch 1, Don’t turn! Working with RS facing, Sc through both layers of front and back of bag.
Sc in ea st starting at top edge corners. Work Sc’s evenly across front to center 2 sts, leave the 2 center sts open (unworked) to insert hanger hook. Sl St in front layer only across the 2 center sts, then Sc again through both layers to enclose top of bag in ea remaining sts ending in upper corner. FO.
Center Opening
Attach plarn at upper right corner of bag opening with a Sl St. Sc evenly down and around opening of bag back up to top left corner. Don’t Sc around top open edge of bag. (This provides a smooth edge to your bag opening.)
FO and weave under all ends.
Option: Add a ribbon bow by attaching a piece of ribbon just above the opening. Tie a bow and trim ribbon ends to match. See this link for example.
If you have any questions or find discrepancies in this pattern, please email me using contact tab above.
Abbreviations:
Ch – Chain
Hdc – Half Double Crochet
Dc – Double Crochet
Dec – Decrease
FO – Finish Off
Plarn – Plastic Bag Yarn
Rnd – Round
RS – Right Side
Sc – Single Crochet
Sl St – Slip Stitch
Sk – Skip
St – Stitch
This pattern is copyrighted by Cindy of My Recycled Bags {dot com} and may only be used for private individual use. No commercial sales or use is permitted. Links to this pattern are acceptable. ©2007-2010
****Please do not copy my patterns on your blog site or post my patterns on Internet sites. I do not allow my patterns to be republished without expressed written permission. Posting of my patterns, without written permission is in violation of my copyrights and is content theft.
Tags: clothespin-bag, free-pattern, peg-bag, plarn


Aug 11, 2007
Crochet a Recycled Clothes Pin Bag…
Cute, practical, ecologically sound. Plus also? Clotheslines! squeal!…
Aug 13, 2007
Great job. Thanks for participating in the Make it from Scratch carnival.
Karen
http://www.balanceindiet.com
Aug 14, 2007
Oh, that is lovely 🙂 Very nice job.
(MIFS)
Aug 14, 2007
that is gorgeous!! Do you do paid work for other people? I would love to buy one like that!
Aug 14, 2007
Bridget,
Yes I do take custom orders for any of my bags I make. I just sent you a PM with the details. Thanks for your interest in my recycled bags!
Aug 15, 2007
Another great project Cindy!
Aug 16, 2007
This is absolutely awesome! I wish I had figured out how to make plarn years ago. I’m totally going to try this. Cool site!
Aug 18, 2007
[…] Crochet a Recycled Clothes Pin Bag […]
Aug 27, 2007
That is a great idea….wow fabulous!!
Sep 05, 2007
Oh my gosh! I think that would be perfect for storing bath toys in the bathroom! Thanks for the inspiration! 🙂
I love the way you recycle your plastic bags! And I have bookmarked your site too! 🙂
Sep 22, 2007
I’d been thinking about making a light cover for mine to stop me having to rush out and get clothes in when it showers. Saw some bloke on dragon’s den with one though, so it’s been done, although his covered the poles only so didn’t protect anything from the rain being blown in.
I use my “sunshine umbrella” – we call them rotary airers (Or at least the shops do)
Mine managed to act as a butterfly egg holder this year. I happened to be hanging washing out when they were all hatching and falling to the ground. Was impressive!
On a sunny day hanging the clothes outside is quicker than the tumble dryer – which is fantastic!
I might give your pattern a whirl when I get a minute as it looks fairly easy! Thanks for the inspiration!
Sep 27, 2007
[…] feature is from My Recycled Bags with the instructions for Crochet a Recycled Clothes Pin Bag Free Pattern for Crocheted Clothes Pin “Peg†[…]
Oct 06, 2007
Thank you for sharing!
Nov 26, 2007
i made one of the bags for my husband,he had a stroke several years ago.so i made one for his bath stuff and he can just take it into the shower with him.
thanks
Jun 11, 2008
How can I print the directions for the clothepin bag. I would love to make one.
Thanks!
Jun 11, 2008
@Susan,
Just use the print button on your browser or you can cut and paste it into
Word and then print. If you’re not seeing the whole pattern, its because
you need to click on the green read more link. Or just click on the post title
at the top to reveal the complete post. Good luck.
Jul 13, 2008
[…] some really cute crochet projects by just adding some ribbon, fun fur, or other embellishments. Here is the link to my free clothespin “peg” bag pattern if you’d like to crochet this project. […]
Jul 20, 2008
This pattern is so cool . I am gonna try it as soon as I get some plarn made up. Which might take awhile…one of the lads is really BIG on recycling…most of the bags end up in the recycle bin…lol.
Aug 30, 2008
Thanks so much for the wonderful pattern – I have to make this, lovely.
Sep 14, 2008
[…] got to the top there and sort of made the bag smaller than the hanger.  I got the directions from This awesome site.   She makes all kinds of neat-o cool things out of plastic bags.  I usually use my canvas […]
May 08, 2009
OMG! I was going to make a Market Bag with my plarn but THIS is what I’m going to make! You are wonderful for sharing such a Fab project with us!
Thank You, Thank You!
Jul 30, 2009
[…] Or why not recycle an existing coat hanger into a peg bag? Free online tutorial here… […]
Aug 29, 2009
Perfect! Mine hangs outside and always rots!
Jan 08, 2010
[…] am definitely in need of a clothes pin bag. There is a crochet pattern over at myrecycledbags made with plastic yarn. I have actually found one knitted version at craftster for free, but since […]
Mar 21, 2010
[…] Or why not recycle an existing coat hanger into a peg bag? Free online tutorial here. […]
Jun 10, 2010
A fab idea! It will stop the butterflies and spiders laying eggs all over my pegs! Last year it was tiny caterpillas roaming the washing line and this year it’s baby spiders! I’m glad they like it but it makes it hard to put the washing out.
Jul 08, 2010
Another good use to recycle thoses plastic bags we get so many of. Can only use so many for wet garbage/coffee grounds/doggie poo, also use them when weeding.
Can’t wait to run around your site and see some more good recycle ideas
Char
Jul 09, 2010
This is great also nice for hanging in the shower at health spa Thank u Virginia
Jul 09, 2010
I just wanted to thank you for this site and the pattern for the clothes pin bag. For the last few days I have been cutting up all my plastic bags and crocheting them into the bag. It is so fun and cute! Thanks.
Jan 26, 2011
I only heard about this way of reusing bags a couple of days ago and think it’s brilliant. Can’t wait to get started!! Thank you
Jun 08, 2012
[…] My Recycled Bags has this crocheted clothes peg […]
Nov 13, 2012
[…] Crochet a Recycled Clothes Pin Bag […]
Nov 17, 2012
[…] Crochet a Recycled Clothes Pin Bag […]
Apr 08, 2013
[…] this for a double whammy? A Plarn Clothes Pin Bag! I could make the whole list from the My Recycled Bags website – be sure to check it out, […]
Apr 22, 2013
Love the PLARN idea-recycling and upcycling rocks!
just a word of caution for something made of plastic bags and direct sunlight. I had some items in plastic bags on my patio and it didn’t take very long for them to disintegrate into little flakes of plastic-I suggest using the clothespin bag-but keep it inside–out of direct sunlight when not in use. This should extend the life of the item- 😉
Apr 24, 2013
@Wendy — Yes some bags do break down faster than others. All the bags I use are non-biodegradable so they tend to last longer. I do agree that not leaving a bag such as a clothespin bag out in the sun and weather does help prolong its life. I do bring my bag in after using it daily and it’s lasted several years now. Thanks for the tips and for visiting my blog.
Aug 10, 2015
I’m at the “easy” pattern stage of crochet. How would you rate this pattern? I’ve only made beanies, slippers, and rag rugs. Would love to make this for a gift, but a little apprehensive about my ability to follow the directions.
Aug 29, 2015
@Yvonne – this pattern is pretty basic as most of my pattern are fairly easy as I enjoy working simple and easy to do things myself. The opening on the bag might be a little confusing but it’s really not too bad. Do you have someone local to help if you run into a question? I could try and help over the internet if I can explain how it goes should you get stuck. Just email me back for help.