July 24, 2008 will be a date I will always remember. It is the day I finished my chemo treatments for breast cancer. It’s a wonderful feeling knowing that I don’t have to have any more infusions of that nasty stuff. So I say hallelujah, yahoo, yipppeee, and thank God for giving me the strength to get through it.
This is also my 100th post of my blog. I can’t believe I’ve made that many posts already. I’ve shared over 60 free patterns for recycled craft projects ranging from tote bags to baby bibs, wheelchair bags to scrubbie dishcloths, and lunch sacks to water bottle holders. Also in these last posts, I shared with you about “my pink journey” with cancer.
Needless to say, it’s time to celebrate. So let the celebration begin! If you drop by for a visit, please leave me a celebration comment.

Ever need a large envelope for mailing? Well I frequently need large mailers for some of my recycled bags I ship. Here is a tip I wanted to share on how to make your own paper mailer from a recycled brown paper bag.
I cut the end off the bag and folded it in half. I then stitched up the two sides using the zig-zag stitch on my sewing machine. I left the top open to insert my items for shipping.
Click on photos to view full-sized
Here is a close up of the stitching.
After putting my items inside the bag, I then folded over the top and stitched my mailer closed. You can also glue around the edges for extra strength if needed. My recycled paper bag mailer is now ready to address and take to my post office for shipping.
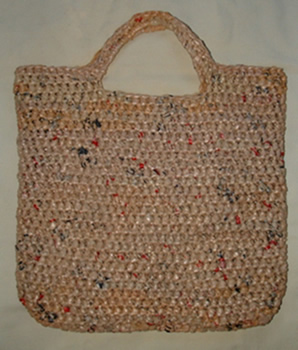
What would be the ultimate grocery bag? Of course in my opinion it would be made from recycled materials, be reusable, strong and very durable. What about free — yes that would be the ultimate. So here it is. It is crafted from recycled plastic bags, it is reusable over and over, doesn’t tear, and it reduces the use of bags from the grocery store. So it is a win-win bag. You win and the environment wins. It’s the ultimate bag!
This bag is created by crocheting with plastic bag yarn or plarn. I have a handy picture tutorial here if you need to know the steps to make your own plarn. It’s a fun and easy way to create a durable market bag as shown above. Plus it’s a great way to repurpose those plastic bags you may have stashed around the house.
I hope you enjoy this green and frugal project. Here is the free crochet pattern below.
*******************************************************************************************
The Free Ultimate Grocery Tote Bag Pattern
Materials needed:
One very large ball of plastic bag yarn aka Plarn
Approx. 50 plastic grocery bags
Hook: N (9 mm) metal crochet hook
Description: Grocery Tote Bag
Bag measures 13-1/2 inches wide and 13 inches long with 9 inch handles
Directions:
Ch 28

White plastic bags are used by many retail and grocery stores these days. They are not the prettiest bags to use for crafting. People give me lots of white plastic bags to recycled. So I’ve been trying to be more creative and come up with clever ideas to turn these dull bags into cute and useful items. What do you think of my clothespin bag with a ribbon bow tie?
Here is a hobo bag I crocheted too. It’s amazing how much a little ribbon adds to the projects. Click on my hobo bag and see if you think it makes a cute summer purse.
Click to view full-sized photos
Here’s an example of adding some fun fur to spice up those white bags in this recycled tote bag pattern.
So take heart if you have lots of white plastic bags. You can upcycle them into some really cute crochet projects by just adding some ribbon, fun fur, or other embellishments. Here is the link to my free clothespin “peg” bag pattern if you’d like to crochet this project. Also you can browse through all my free patterns at this link.
Enjoy and happy green crafting to all!

Yes, 3 treatments down and only one more to go. I’m so happy to say that I have only one more chemo treatment left for my BC. What an uplifting feeling it is to know that I’m nearly done with chemotherapy. I’m feeling still a little crummy after my last chemo on Thursday, July 3. But hey, you got to feel a bit lousy if we want to kill off this cancer, right? Anyway I’m doing okay and usually by about day 5-6, I feel pretty normal again so I’m hoping tomorrow the chemo fog will lift.
So for everyone that has been emailing me for an update — I’m still here. I’m feeling okay for now. I still have a very positive outlook. I reminded how lucky we all are that are facing this cancer beast. We have the greatest medicines to kill this stuff and the greatest force on Heaven and Earth — God!
So for all of us who are fighting this foe — take heart, hold onto your faith, carry your head high, we can and will win this battle!

Happy 4th of July! I love handmade dishcloths and even better are ones that have center scrubbers. Just in time for the big Summer holiday, here is my latest “Sunshine” dishcloth I crocheted with a center scrubbie made from recycled plastic bags.
Here is another variation using scraps I had leftover and is one round less than the original pattern as I ran short of materials.
Click to view full-size
These dishcloths with center scrubbies are very durable and handy for cleaning your dishes. Here is a picture tutorial on how use plastic bags to create plastic bag yarn or plarn. This is a great way to use up scrap cotton yarn and also re-purpose those unique colored plastic bags as you only need a small amount of plarn for the centers. Here is the free pattern for everyone to enjoy this fun recycled green craft project.
******************************************************************************
Sunshine Dishcloth with Scrubbie Pattern
Dishcloth measures: 9 inch Square
Hook: Metal H (5 mm) US sized hook
Materials:
1-1/2 ozs. of Cotton yarn – variegated yellows
Small amount of white Cotton yarn
Small amount of plastic bag plarn for scrubber center –
white (1 bag) and yellow bags (2 bags needed)
Option: This pattern can be worked all in cotton if you’d rather.
Allow about 2 ozs. of cotton for project.
With center color (white plarn shown) Ch 4, Sl St to form ring.

It has been a month now that I have been without my hair. Yes, it was very traumatic losing my hair but I have moved on now. At first I thought I had to have a wig to wear to feel “normal.” But after the first week of wearing the free wig I received from a local hospital wig bank, I found it uncomfortable. It’s hot and itchy at times. Most people who don’t know me, think it is my own hair so it gave me time to adjust. In case you are in need of a wig due to cancer, you should check with your local hospitals or cancer treatment centers. They usually have free wigs and scarves that are donated to them. I have gotten some really cute scarves and do rags that people handmade or donated to these organizations for people just like us who need them. Here is one such site on the Internet who provides free hats to cancer patients. Heavenly Hats sent me a wonderful box full of brand new hats. The hats vary from knitted stocking caps to brimmed hats.
Anyway most days now I just wear a pretty scarf or my favorite tan baseball hat. Even at work, I wear a baseball cap as our small office all got matching baseball caps with our logo on them to wear. My two female co-workers wanted to have matching hats so when I had to start wearing one due to my hair loss, they wanted to wear a hat too in solidarity. I was so touched. So we’ve all been wearing our hats at work and not too many people have said anything.
Several people have been emailing and posting questions, asking how I’m feeling. I’m happy to report that I am feeling fine these days. I am just gearing up for next week’s chemo. On July 3, I will have my 3rd treatment and then on July 24, I will have my final one. What a wonderful feeling it will be when I complete chemo!
So this is my latest update. I do wear my wig on special occasions when a baseball cap isn’t appropriate. But mainly I love wearing my comfortable cap. So until this pink journey is over, my non-hair style will be hats, scarves and a wig when necessary.
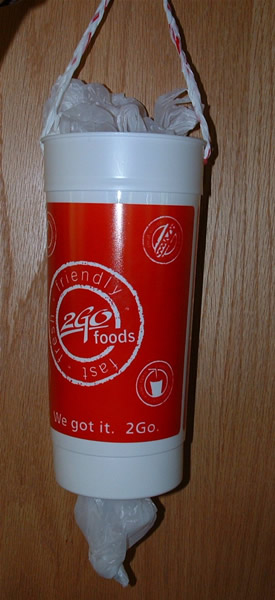
I have had several requests for recycled crafts projects that kids can do. With that in mind, here is a quick upcycle project that children and adults can both enjoy. First you need a large plastic container. The container I used was a 64 oz. soda pop cup that I found and decided that I would re-purpose into a plastic bag keeper.
Here is the finished plastic bag keeper
Below is a picture tutorial that I put together to show the steps for this project.

I purchased a new craft tool recently. It’s called a Spool Knitter. This little plastic weaving tool is so handy for making purse straps that I wanted to share it with you.
My first test was to weave a purse strap using recycled VCR tape. Here is a closeup of my strap which you can click on to view full sized.
Here is a photo of the completed VCR / VHS tape purse with my woven strap.
Like this little red fun fur VCR bag? If so here is the free pattern which has a crocheted strap or you can use a Spool Knitter to create a woven strap. This tool also works wonderfully to weave with regular yarn and recycled plastic bag yarn or plarn. Whatever your material, you can create nice sturdy straps quickly with this gadget.


Recent Comments