
I just finished participating in a crochet along (CAL) over at my Trash to Treasures group at Ravelry. Several of the members of the group crocheted this checkbook wallet organizer from recycled plastic bags. We each crocheted the plarn pattern that Crochooley shared in what she called a crochet – plarn along (C-PAL) that she hosted at Ravelry. Crochooley is a fellow plastic bag crafter whose blog is found here.
Here is an inside picture of my checkbook wallet which is complete with a pen holder and an ID slot. The checkbook wallet has a strap band closure and features a big flower decoration that uses a pop tab for the flower center.
Click on any of the photos to super-size them.
Here is a picture of the flap edging I did. I found working the reverse single crochet (SC) around the flap just didn’t work for me. With the outside facing out, I started at the right corner of the flap and worked regular SC stitching around the flap edge as shown and then down around the front of the wallet and back up the flap back to the beginning.
I enjoyed making this checkbook wallet and found the pattern fairly easy to follow. Crochooley was very helpful when I had questions concerning this recycled bag pattern. So if you are looking for a cool and basically free craft project, I recommend checking out this cute checkbook wallet organizer.

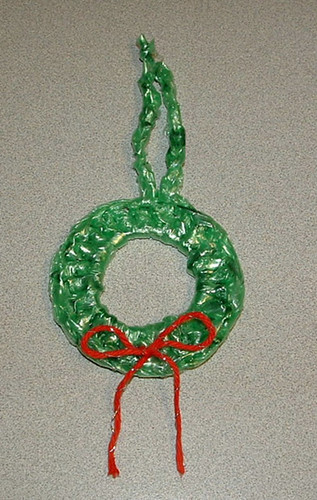
I crafted these Christmas wreaths by using recycled rings from milk, juice, and other bottles for my wreath’s base. The crochet wreath pattern I used can be found over at Ravelry that a blog friend Kristy posted. The ruffled wreath was created by just working more double crochet stitches around. Just add stitches to get the desired ruffling for your wreath.
By using rings that you recycle from bottles and jugs, you can save yourself money on crafting supplies as you have no need to purchase plastic rings for your wreaths. Not only can these rings be used for wreaths, they also be used on potholders and other crafting projects that call for round plastic rings.
Here is my green plarn wreath. I crocheted this using plastic recycled from packing pillows cut into plarn. I did just a single round of double crochet stitch around an apple jug ring for this little wreath with a J crochet hook. A small piece of red cotton yarn was used to add a bow to the wreaths. That’s all it takes to make these cute and quick little recycled wreaths. Enjoy!

Time to kick of the holiday crafting with this little plarn Christmas bag I crocheted. Isn’t it adorable and guess what — its free to make. All you need is a few recycled plastic bags to create this cute little striped gift bag. So grab about 3 red, green, and a white plastic bag and cut them into plarn. For this project you want your plarn to be real thin so I cut my strips only about 1/2 inch wide.
With the built-in handle, you have a ready made gift bag perfect for that special little gift item or you can slip a gift card into your recycled plastic gift bag. My inspiration was Kristy’s ornament pattern as I tried doing it in plarn (plastic bag yarn) and it came out way too big. So I just modified the top and added the handle for a closure.
My little plarn Christmas bag is 6 inches wide by 3 inches tall. The handle is 3 inches long. Using a H crochet hook, I basically followed the pattern by Kristy until row 18 which was my last row to work. I marked the center of my bag by laying it down flat. Sc around in each stitch of this last row — at the center chain 3 and skip 2 stitches to create your hole for the handle. Then Sc in each stitch around to other center mark for the handle, chain 22 for handle. Skip 2 stitches and Sc into last stitches of row and finish off.
Volia — Your recycled Christmas gift bag is complete. You also can come and join the fun over at Retro Housewife’s Green Holiday Carnival that I am participating in this weekend.

As you may know, many of my crochet patterns are worked in the round and without joining. This has become a very popular and handy way to make crocheted bags and rugs so you do not need to count rows or use stitch markers. I have had several people contact me asking for clarification on how to work in the round. So I taken a few pictures and created this picture tutorial which hopefully new crocheters and other crafters who are not familiar with this process can benefit from my tutorial.
I have chosen one of my favorite patterns and will illustrate how to work plastic bag yarn or plarn in the round. Here is my signature recycled bag purse pattern which is crocheted in the round.
The first step is to chain 26 for this particular pattern.
Hdc in 2nd chain from hook and in each stitch down to the end.

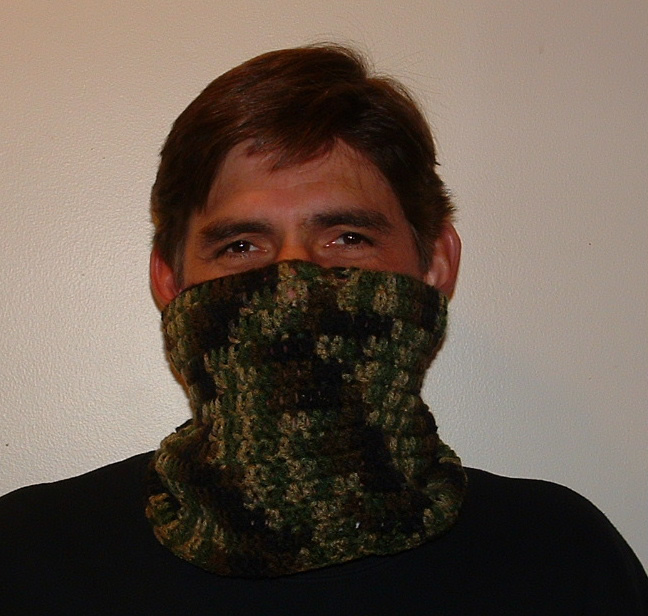
I present my crocheted neck wrap scarf. It is crocheted in the round and just slips over your head. As shown, it can be worn up over the chin and nose. It would make an excellent neck warmer and face warmer for winter and for snowmobiling.
You can make it smaller and larger as desired by just adjusting your beginning chain. I have made several of these and found the snugger fitting ones work better for staying up on the nose. You can wear it just around the neck but this scarf gives you the option of pulling it up around the chin and nose to keep you extra warm.
This is a very quick and easy project that uses less than 3 ounces of worst weight yarn. These neck wrap scarves make excellent gifts and would be a great Christmas gift too. Enjoy the free crochet pattern below.
Crocheted Neck Wrap Scarf
Finished adult scarf measures: 11 inches wide by 7-1/2 inches long
Hook: Metal G (4-4.25 mm) sized crochet hook
Materials: 3 oz Camo Super Saver Worsted Yarn
Rnd 1
Ch 65 loosely and then join to the beginning to create a circle. Be carefully that your chain is not twisted when you join the first round. […]

Time for a new recycled plastic bag project. Things have been a little hectic lately and I haven’t been able to craft and post new patterns as frequently as I would like. But this week I was able to get some plastic newspaper bags cut up into plastic bag yarn. I just love this beautiful shade of pink salmon that my local library gets their newspaper delivered in. For those people who may have not read my fat bottom bag post, these beautiful bags are being saved by my local library. I pick them up about twice a week and it’s a wonderful resource for me to be able to obtain unique and colorful bags for my recycled crafting projects.
I actually counted the number of bags I used in this crocheting project. It was 29 plastic bags. I cut them about 1 inch wide and interconnected them together using the loop method. Each newspaper plastic bag results in about 17-18 loops if anyone is interested. Anyway this water bottle holder holds a 32 oz Nalgene bottle or a store bought 1 liter bottle of water. Because these plastic bags are a bit thinner I used a K crochet hook rather than my standard N hook. The smaller hook provided a tighter stitch and a sturdier water bottle holder.
Please enjoy the free crochet pattern below and happy crafting to all!
*****************************************************************************************************************
Recycled Newspaper Bags Water Bottle Holder Pattern
Material Needed: 29 salmon pink newspaper plastic bags cut into 1 inch strips and connect into plarn.
Plastic newspaper sleeve bags were used in this project. Cut the strips and assemble
just as you do in this plarn making tutorial.
Hook:
Metal K (6.5 mm) crochet hook
Water Bottle Holder Size:
Bag – 5-1/2″ wide, 7″ long, with 4″ round bottom
Strap 40″ long & 2″ wide
Fits water bottles that are 32 oz reusable bottles or 1 liter plastic bottles
With pink plarn, Ch 4, Sl St to join in first st of chain to form ring.

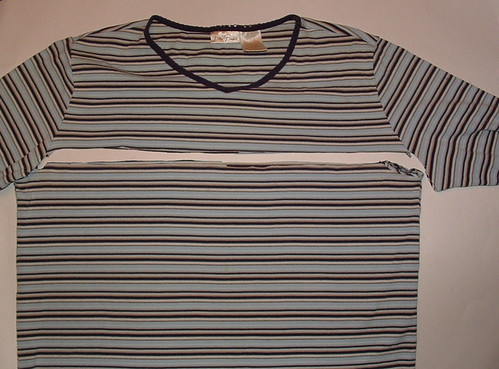
This month’s challenge over at Trash to Treasures on Ravelry has been to do a wardrobe re-do. This means to take some old clothing item and transform it into a new and useful item. I have had this striped t-shirt that I have been saving just for such a project. The neckline was frayed and this old tee needed to be upcycled into a new shirt.
Here is the before photo of my t-shirt.
Next I cut off the top of the shirt as shown.
I loosely followed the Drop’s crocheted yoke pattern that was added to the top of a knitted sweater for my project. I first zig-zagged around the top cut edge of my shirt to prevent it from unraveling. I ended up running around the top edge twice just to make sure the seams wouldn’t fray. I chose Lion Wool yarn in midnight blue and it took just one skein (3 ozs) to completed my yoke. Using a #7 steel crochet hook, I worked around the top edge by poking a hole and pulling my blue yarn through the hole. I did a single crochet stitch evenly all long the front, underarms, and the back of the shirt. I used a G hook from this point on.
Once my base row was completed, I needed to reduce the number of stitches around, so I work 2 single crochet stitches together around the entire next round. I then worked round 3 with a double crochet in each stitch and chain 30 (8-1/2″ long) for the sleeve opening on each side of my shirt. From here I worked more decreased evenly over the next rounds while somewhat following the chart in the Drops Design pattern. I did find I had to make more decreases to get the yoke narrowed down but in the end it turned out nicely.
Here is my final crocheted yoke photo. The dark wool just doesn’t want to photograph very clearing but you can click on the photos to supersize them. So if you have an old t-shirt, consider adding a crocheted yoke to give it a new look like I did in this wardrobe re-do project.

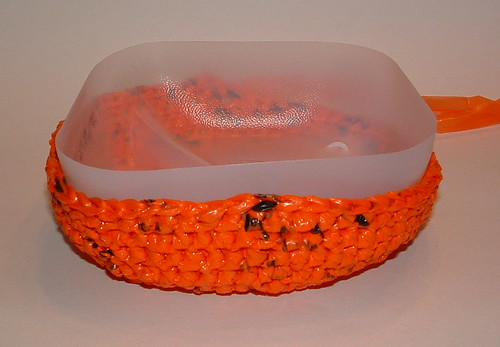
Halloween is just around the corner and I’ve been saving plastic orange newspaper bags for quite awhile so I could crochet a recycled trick or treat bag. I just got it finished in time and am here to share the project with everyone.
This trick or treat bag features a milk jug base so its nice and sturdy. With a sharp pair of scissors, just cut around the bottom of the milk jug as shown in the photo below. The jug I used had a line around the base so it made it easy to cut it evenly around the bottom. By recycling a plastic milk jug, you create a trick or treat basket that will hold its shape and your candy nicely.
Once you finish crocheting the bag, you can always add more embellishments like eyes and a mouth to the project. I took a few pieces of VCR tape and created a quick face for my trick or treat bag. So this concludes my Halloween project for the year. Enjoy the free crochet pattern below — Happy Halloween!
_____________________________________________________________________________________
Trick or Treat Plastic Plarn Basket
Materials needed: One ball of orange plastic bags cut into strips 3/4 inch wide and interlocked
to create a ball of plarn – (Approx. 20-25 bags)
Small amount of green plastic bags cut into plarn for strap
One plastic milk jug
Here is my picture tutorial on how to make yarn from recycled plastic bags.
Hook: K (6.5 mm) metal crochet hook
Description: Orange Trick or Treat Basket –
Basket measures 9 inches across front and 6-1/2 inches tall with 14 inch handle strap.
Directions:
Ch 3 and join with a Sl St to form a ring.

Just when everyone is getting into the pink and promoting pink for breast cancer awareness, I’m posting about being out of the pink. My being out of the pink is a really good thing. Because what I’m referring to is my being free of breast cancer.
For those that may not know about my pink journey, you can read all about it at the link provided. I haven’t posted about my cancer in quite awhile. Not that I don’t think about it but sometimes it’s just good not to have to dwell on cancer too much. For the first year after being diagnosed with cancer, that’s all I could do was think about my cancer. At times it felt like I could never NOT think about it. It’s always on your mind and you try real hard not to let it drive you crazy. Then as time goes on, it gets better. It’s not in every thought you have. It’s not the first thing you think about when you wake up and it’s not the last thought you have when you drift off to sleep. You do learn to deal with it or at least come to terms with it.
The battle is never easy and at times unbearable. But for me, time has helped and my body has healed. It’s been just over two and a half years now and with just having completed scans for cancer two weeks ago, I have good news. I am so happy to say — I’m out of the pink and into the NED. NED being no evidence of disease. All I can really say is praise God and try to remember to enjoy each and every precious moment of life.
If you take nothing else from this blog post, I hope you take a moment to be thankful for your health, your life, your family, your faith, and remember all those who are still battling this vicious foe. Some day all our tears will be wiped away and there will be no more pain, no more sadness, and no more death.


Recent Comments